As Hen Gathereth

Detail from

I recently finished another painting commissioned as a gift for the client’s spouse. It is based on the scriptural quotation “how often would I have gathered thy children together, even as a hen gathereth her chickens under her wings…”

The process was the same pretty standard thing I’ve described before. A few interesting things though:

  1. I ended up combining 10 different photos to get a single reference image—chickens are not good at following modeling direction, so 4 of the 10 photos were just different parts of the main chicken that I had to composite the get the pose we needed.
  2. Chicken faces look like scary dinosaurs. You can see between the last progress and the final that I altered the chickens face to make it slightly less scary.
  3. Ipads do not record reliably accurate color in their photos (I imagine this is true for most mobile devices). All the progress photos were taken on my ipad. Though I did do a little glazing that softened some of the colors, that doesn’t account for the huge difference color-wise between the photo of the final, which was matched to the original, and the last progress shot.

Thumbnails for

Drawing for

Toned drawing for

Progress on

Progress on

Progress on

Star Citizen Commission

Painting of Super Hornet spaceship from Star Citizen, by Jameson Gardner Art

I finally have a decent image of a painting I finished at the end of the year. In my rush to get it shipped to the client, I didn’t look closely enough at the photographs I took to notice the glare from the painting’s texture until after I had already sent it off. Luckily, the client was able to send me some photos (thanks Bonnie!) that I composited with mine to eliminate most of the glare.

The commission was to do a painting of one or more ships from the game Star Citizen. The client was giving it as a gift to her favorite star citizen. Though there was nothing special about the way it was painted (oil on panel), the challenge for me lie in drawing and painting mechanical components with which I was not familiar. I did manage to find some rough 3D models, and there were images on the game’s website, but I felt like there were a lot of details I was missing. The client and I agreed in the beginning that a little bit looser retro vibe would be nice, even though most of the images that I could find from the game tended to be more sharp computer-generated-realism. I looked at a lot of artwork from John Berkey and John Harris for inspiration. Both those artists tend to hint at details while actually being pretty vague about the nuances of their space ships. I really like this, but when I got started myself, I found I had a hard time abandoning what details I’d uncovered when I was supposed to be painting a specific and concretely designed ship.

Don’t worry, it still didn’t come out super detailed.

I also ran into the issue of all the game images showing this ship with a shinyish metallic finish. I’m not saying it wouldn’t be possible to do, but considering the time-frame, the budget and the scale of the painting, mocking up enough shiny reference to paint it believably in a relatively small space just wasn’t in the cards. So we stuck with the retro vibe and the ship got more of a Star Wars, or original Battlestar Galactica paint job.

Other than that, it was mostly the usual sketching, approving, drawing, approving, painting.

Sketch by Jameson Gardner Art for Star Citizen commission painting

The thumbnail turned value comp above, and the final drawing below. Between the two we discussed and decided to add another planet in the back, an element that had been included in one of the other thumbnails.

Drawing by Jameson Gardner Art for Star Citizen commission painting

Painting steps of Star Citizen commission painting by Jameson Gardner Art.

Some steps in the painting process. I kind of like the empty planet.

Image with glare from surface texture

Above is the final painting, but with glare from the surface texture visible, despite my best efforts to fix it. And below, the final image with reduced glare and proper values on the top half.

Painting of Super Hornet spaceship from Star Citizen, by Jameson Gardner Art

Valkyrie Painting (finally)

A lot of things have been limiting my art production. First, we had a baby. We didn’t really bother with anything but learning to be parents right after Halvor was born. Then Bethany went back to work, and I was taking care of him during the day. The little squirt barely let me shower and put clothes on, much less get a lot of painting done. Then when I finally started figuring out how to get some work done and had begun painting on this valkyrie piece, our apartment flooded. Luckily none of our stuff was seriously damaged, but after moving all our possessions back and forth trying to dry the carpet out, we eventually had to move out for a couple weeks.

Well, I’m back and I have an artwork to share.

I started this piece with the combined goal of making something nice (hopefully), and also testing to see if the oil painting with overlaid drawing technique from my folktale princess piece would be viable for book illustrations.

Concept:

Not too long ago I had been listening to music from Wagner’s Ring Cycle and reading a little about Brunhilde and some of the other characters. I started to think that making a painting of a valkyrie or shield maiden would be cool. I sketched out some little ideas and started doing more research. I thought maybe I would have a woman all armored up and spearing people from horseback! Sounds pretty sweet right? But, the more I read the more my concept for this painting changed. That isn’t to say that the Norse epics don’t include plenty of foundation for a valkyrie staining the field of battle with the blood of her enemies. However, I started to focus more on the idea of valkyries enabling the transition of slain warriors to the immortal realm of Valhalla. I combined this with the idea of the valkyrie bringing drink to the warriors in the hall of the slain and decided to try to illustrate a tender valkyrie bearing mead from the gods to ease a fallen warrior’s final moments of life—a sort of rite—the last sip of mortality and the first taste of Valhalla.

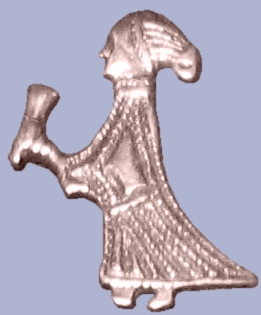
With this in mind, my idea of how she would look and dress also changed. I based her partly on this silver amulet from Sweden (found on Wikipedia):

Wikipedia commons: A silver figure of a woman holding a drinking horn found in Birka, Björkö, Uppland, Sweden.

I also decided to give my valkyrie wings. That was a decision I felt would help compositionally and would also easily distinguish her from mortal women. I’m not displeased with any connection that draws to depictions of Christian angels either.

Process:

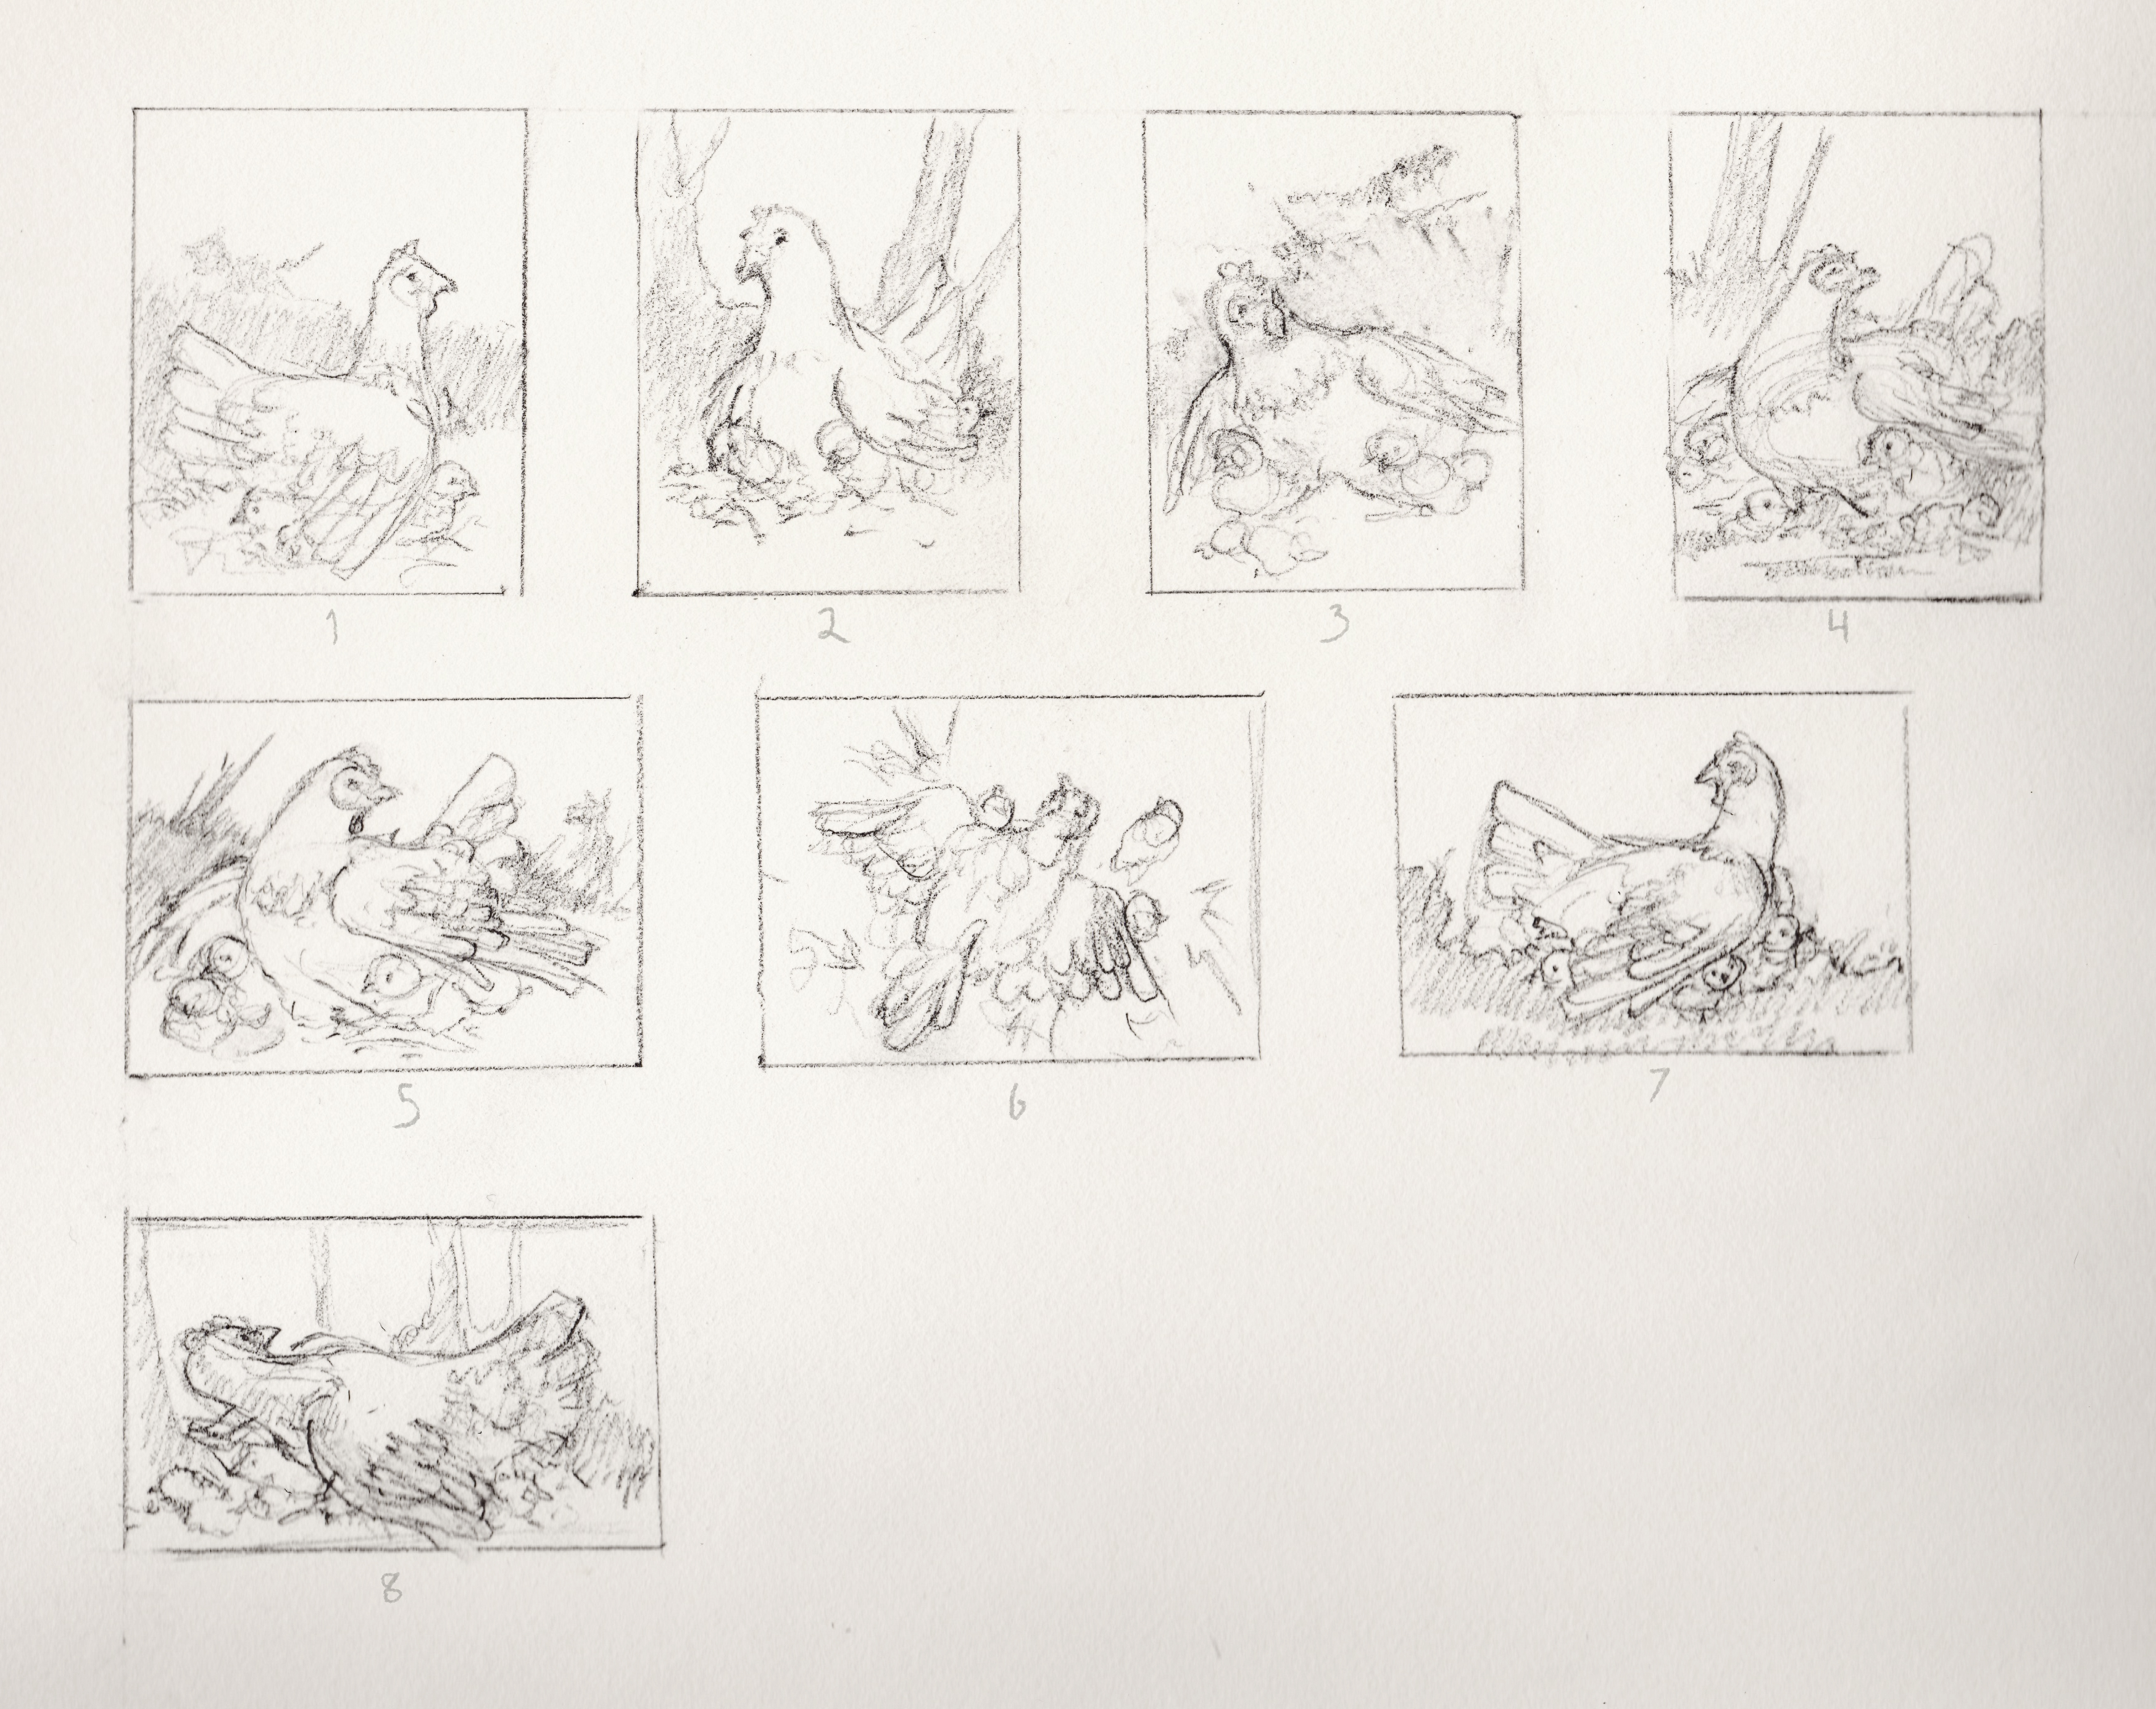
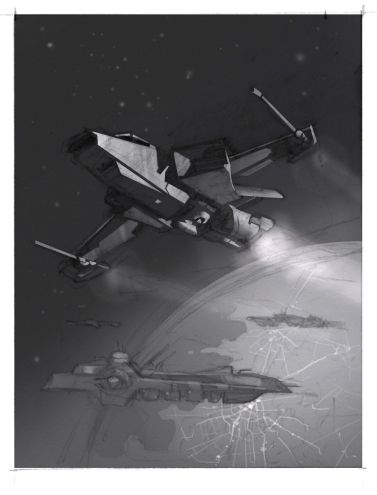
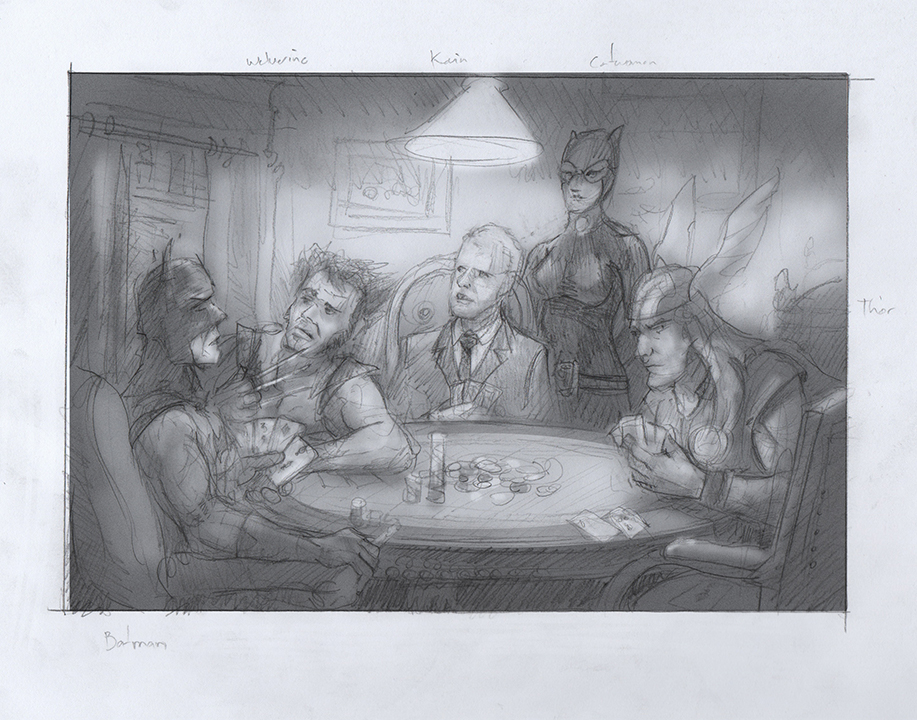
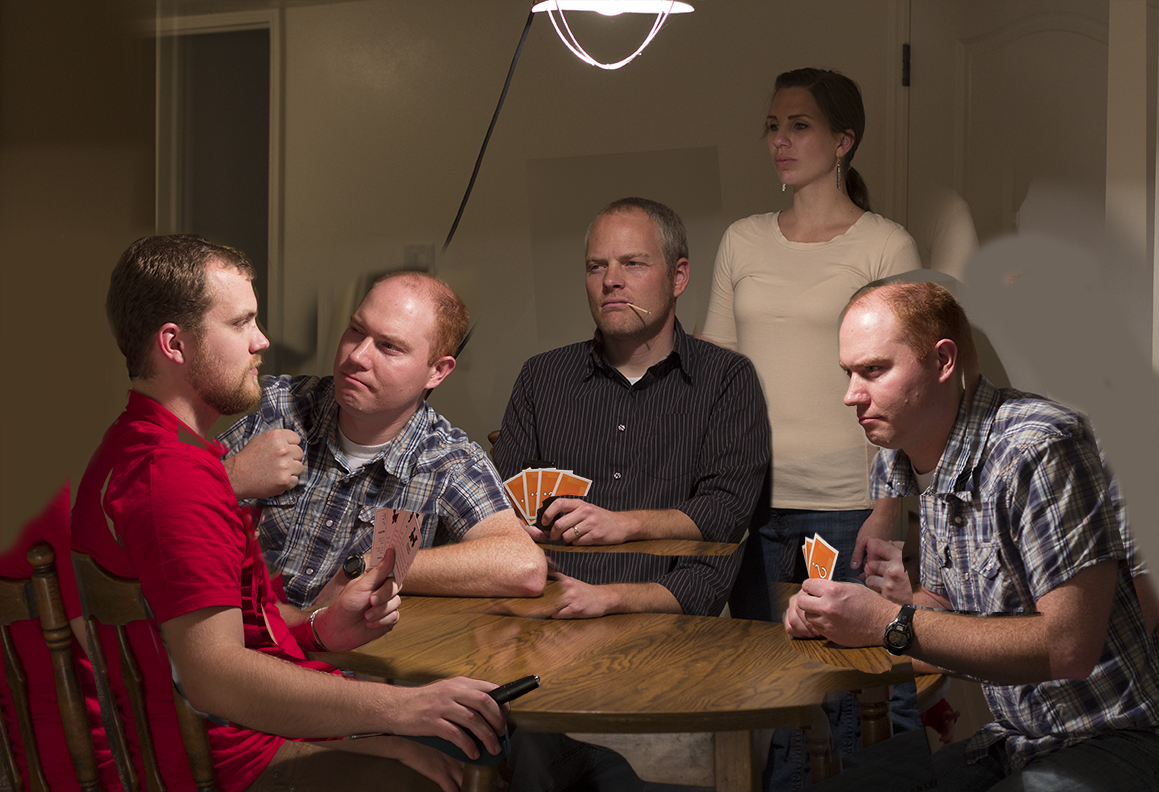
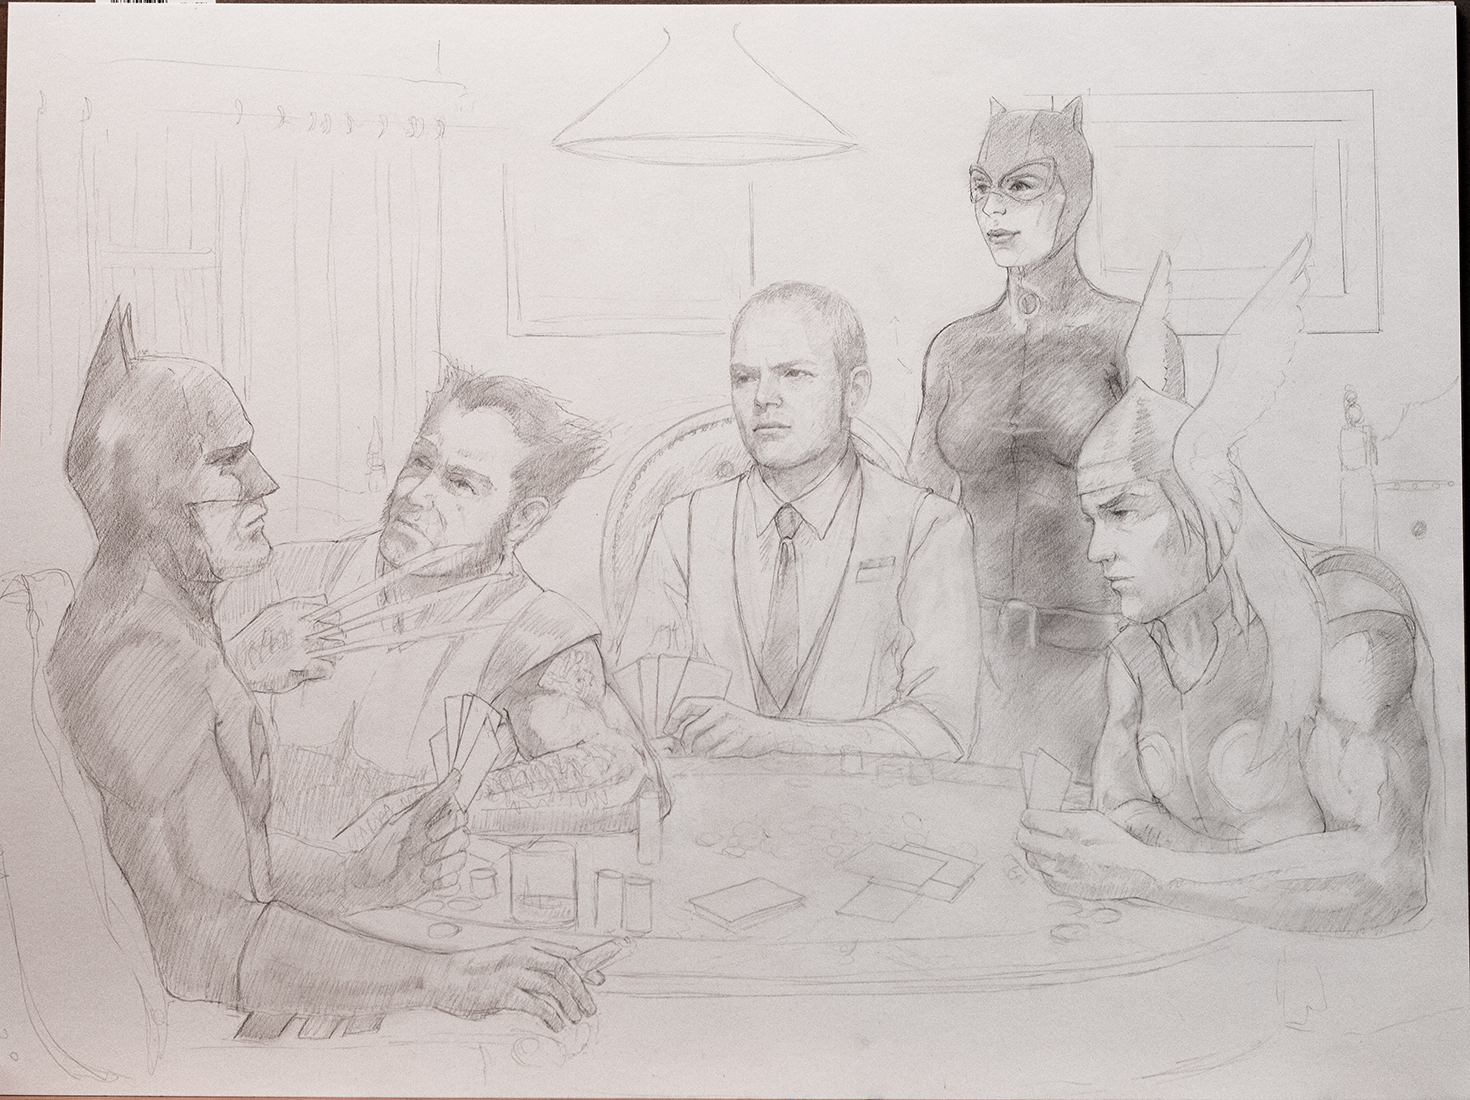
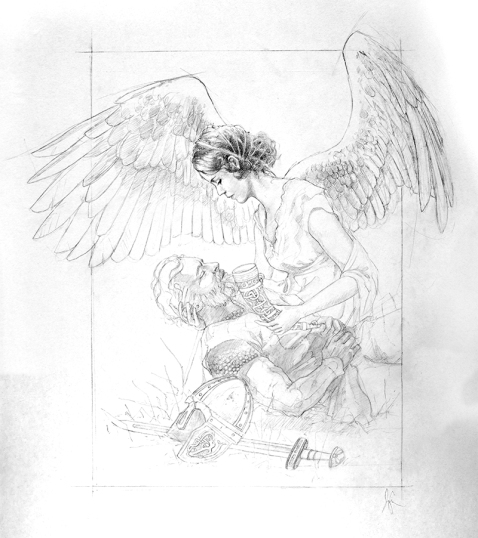
The process was very similar to that described in my post Painting a Princess. Only this time I planned  from the beginning to bring the drawing back as an overlay. I began with a small sketch of the basic composition and then spent quite a bit of time compositing reference. Various vintage photographs from the internet as well as a few photos I took myself were cut up and combined into my composition. My preferred method is usually to shoot all my own reference, but, sometimes I get impatient if I don’t have models available. For just the valkyrie I ended up referencing 3 vintage photos, an eagle’s wings, my wife’s arms and hands and a grouse wing I happen to have around the house—similar story for the viking warrior (there is even a little bit of Elvis and a little Colin Firth in there).

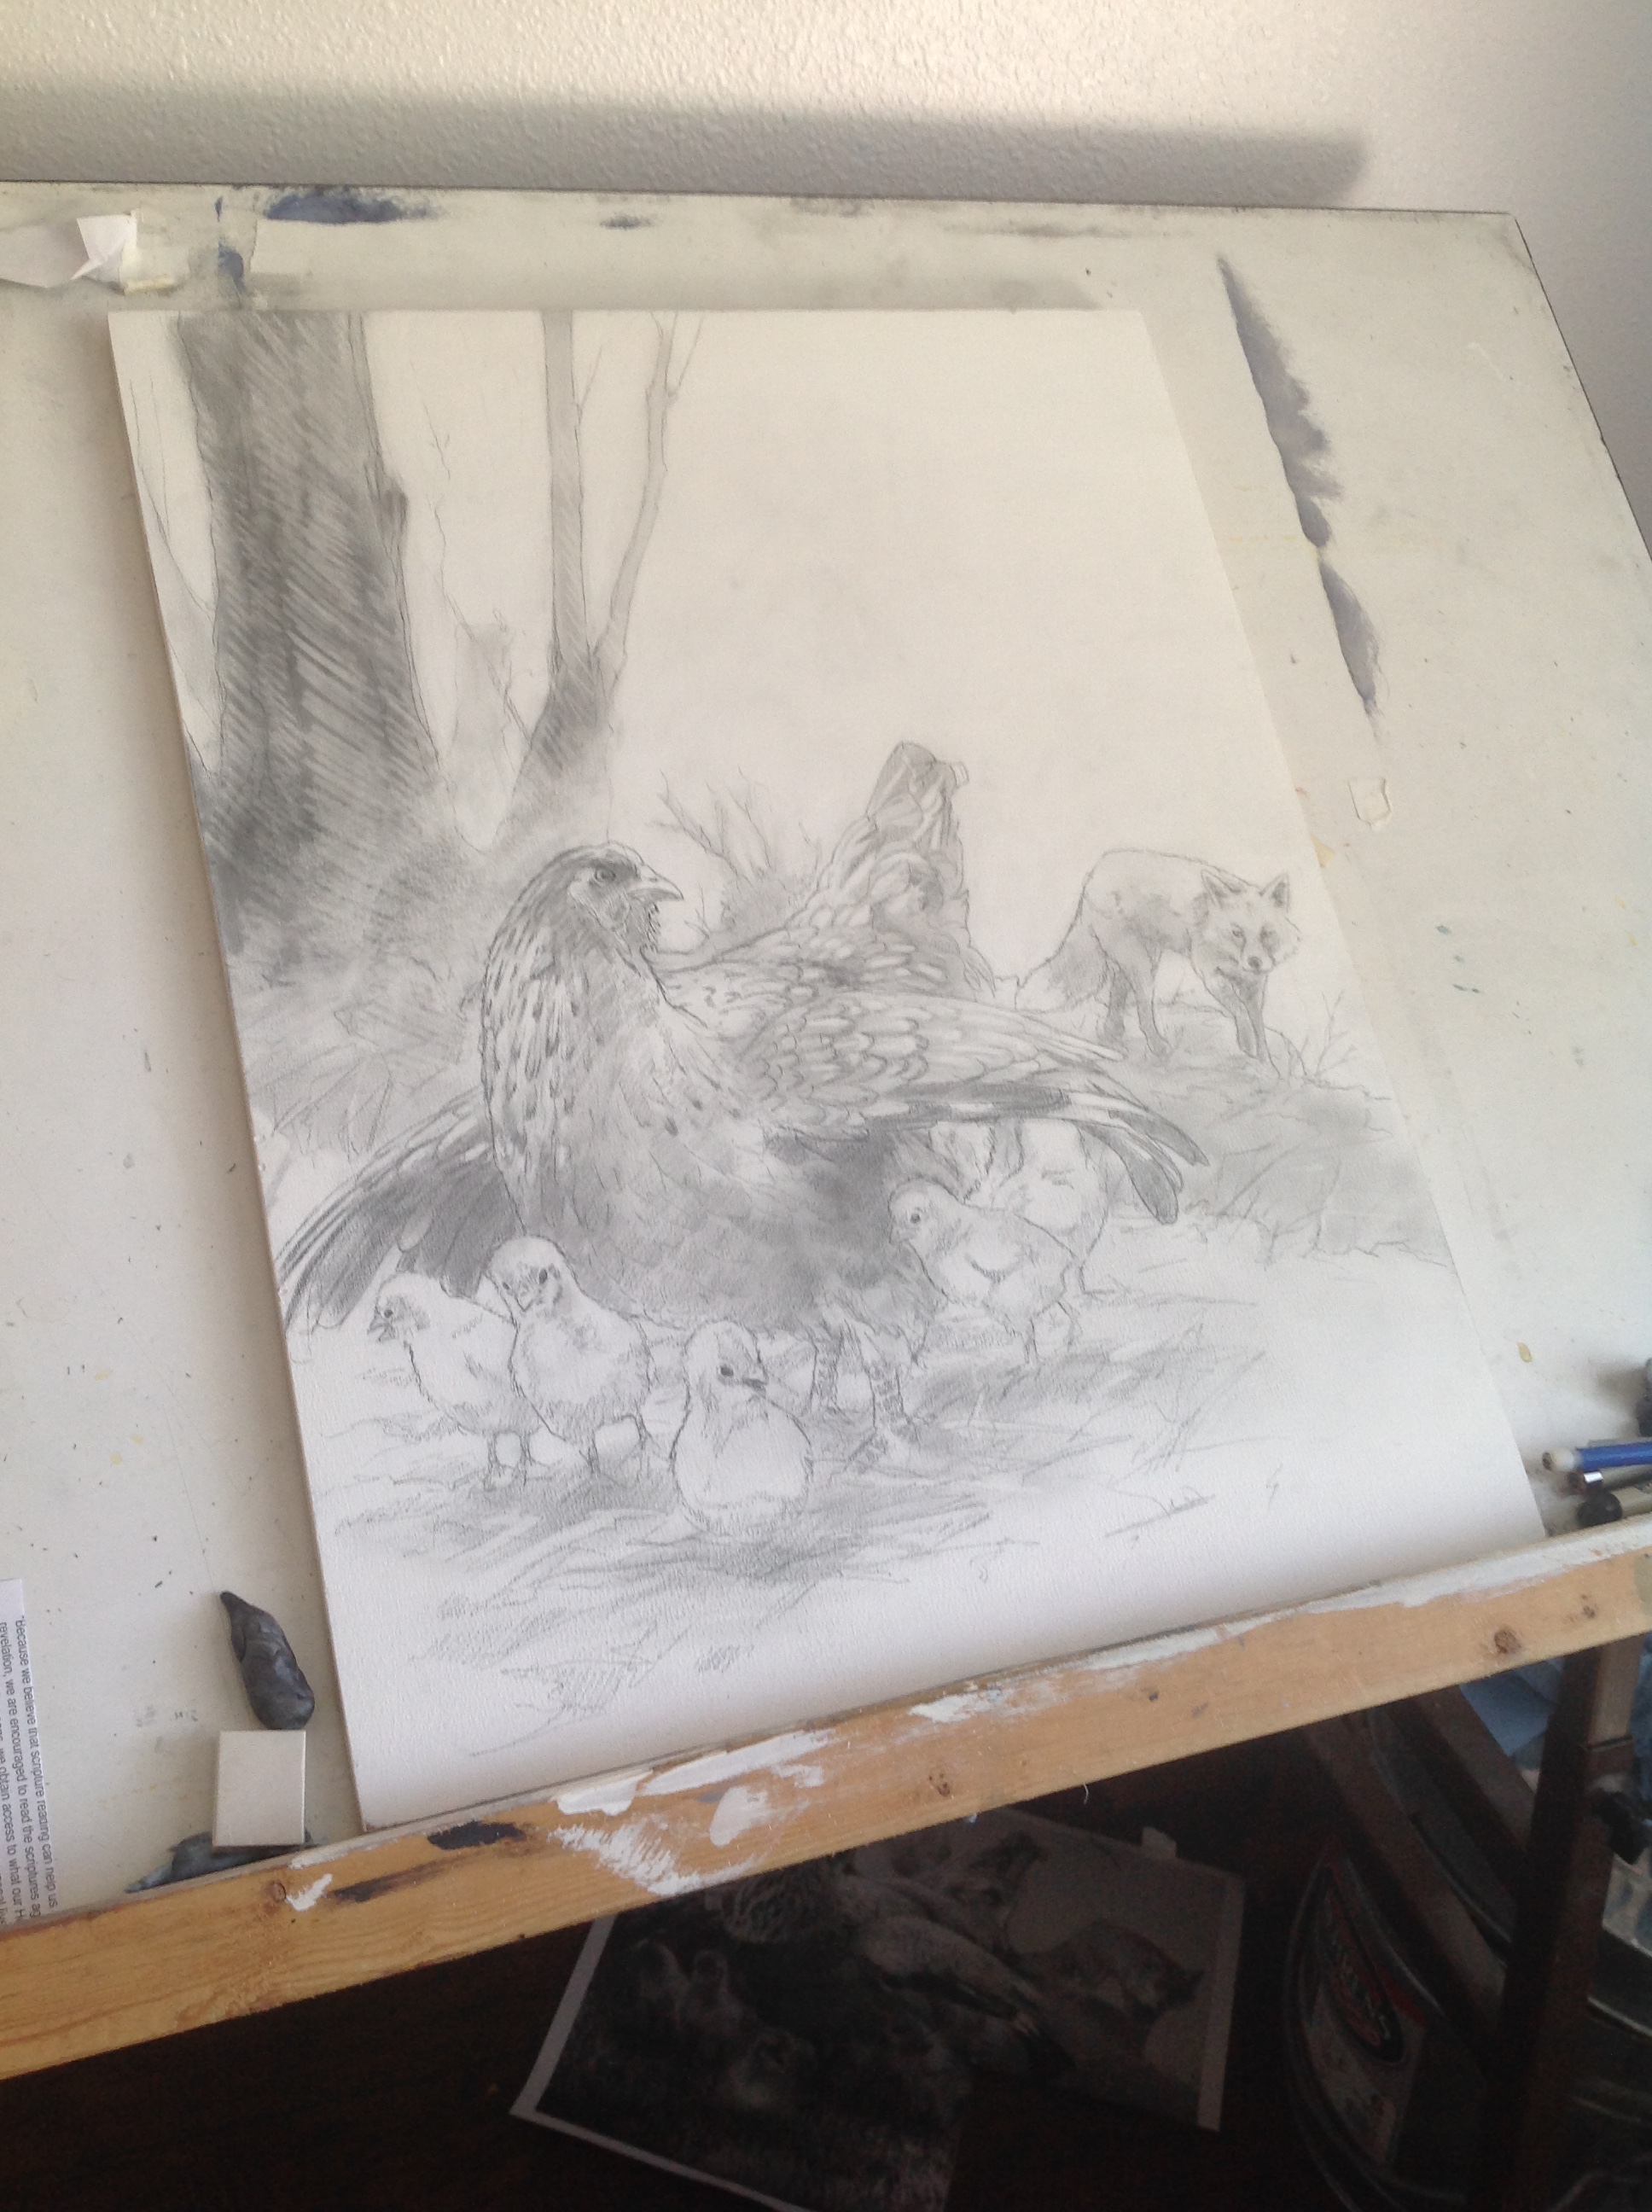
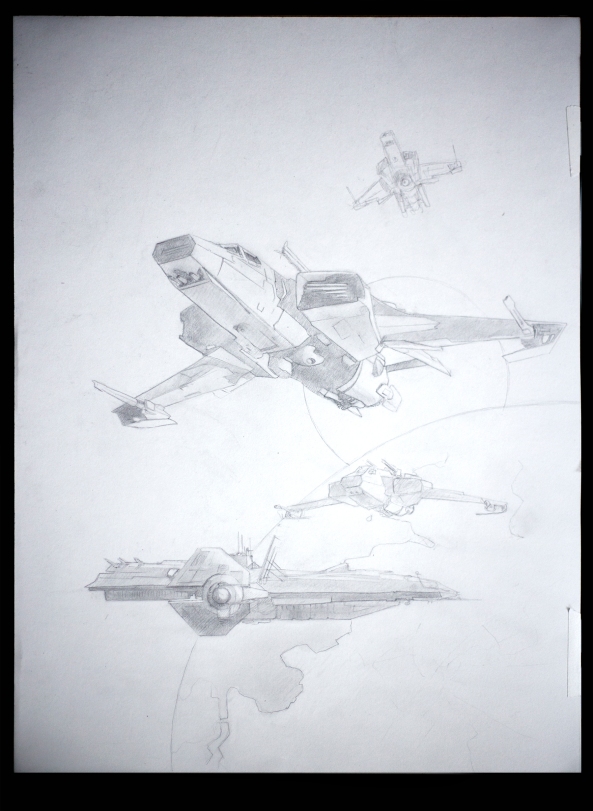
With all of my reference composited I did a pencil drawing.

Valkyrie drawing by Jameson Gardner 2016. Study for Painting

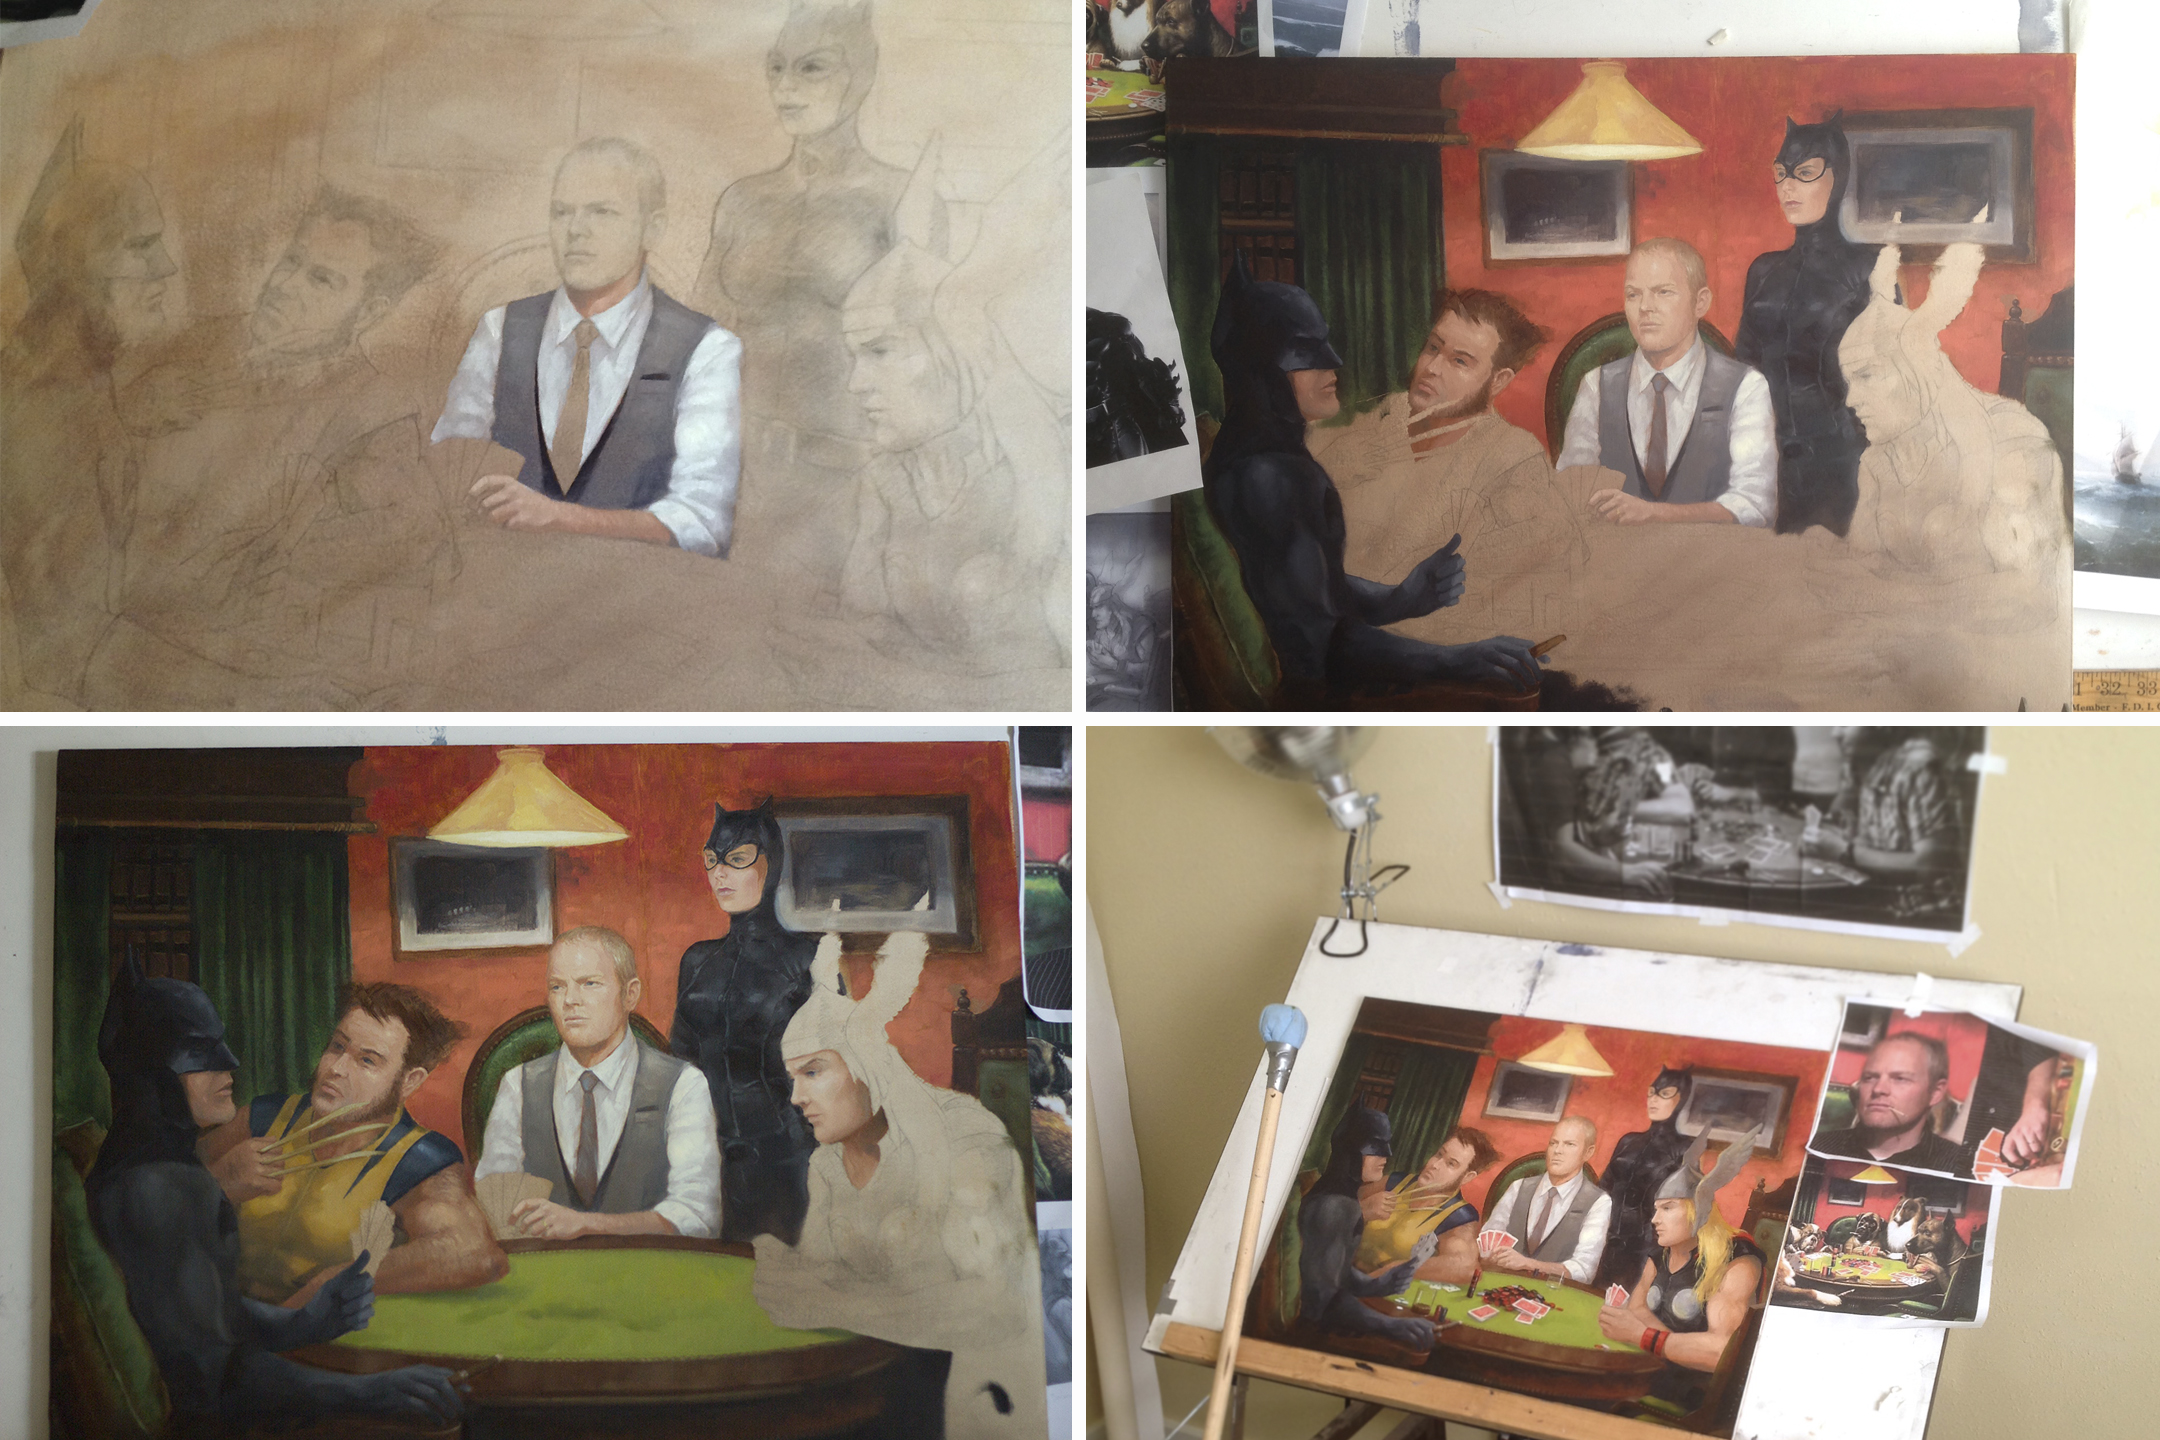
I then photographed the drawing and mounted it directly to a panel and sealed it with matte medium for painting. I sometimes use the photographs to make a print which I mount and paint on so that I can keep the original, but again, I was a little impatient. Looking back, I think a lot of those decisions on this painting were made with the baby’s schedule in mind.

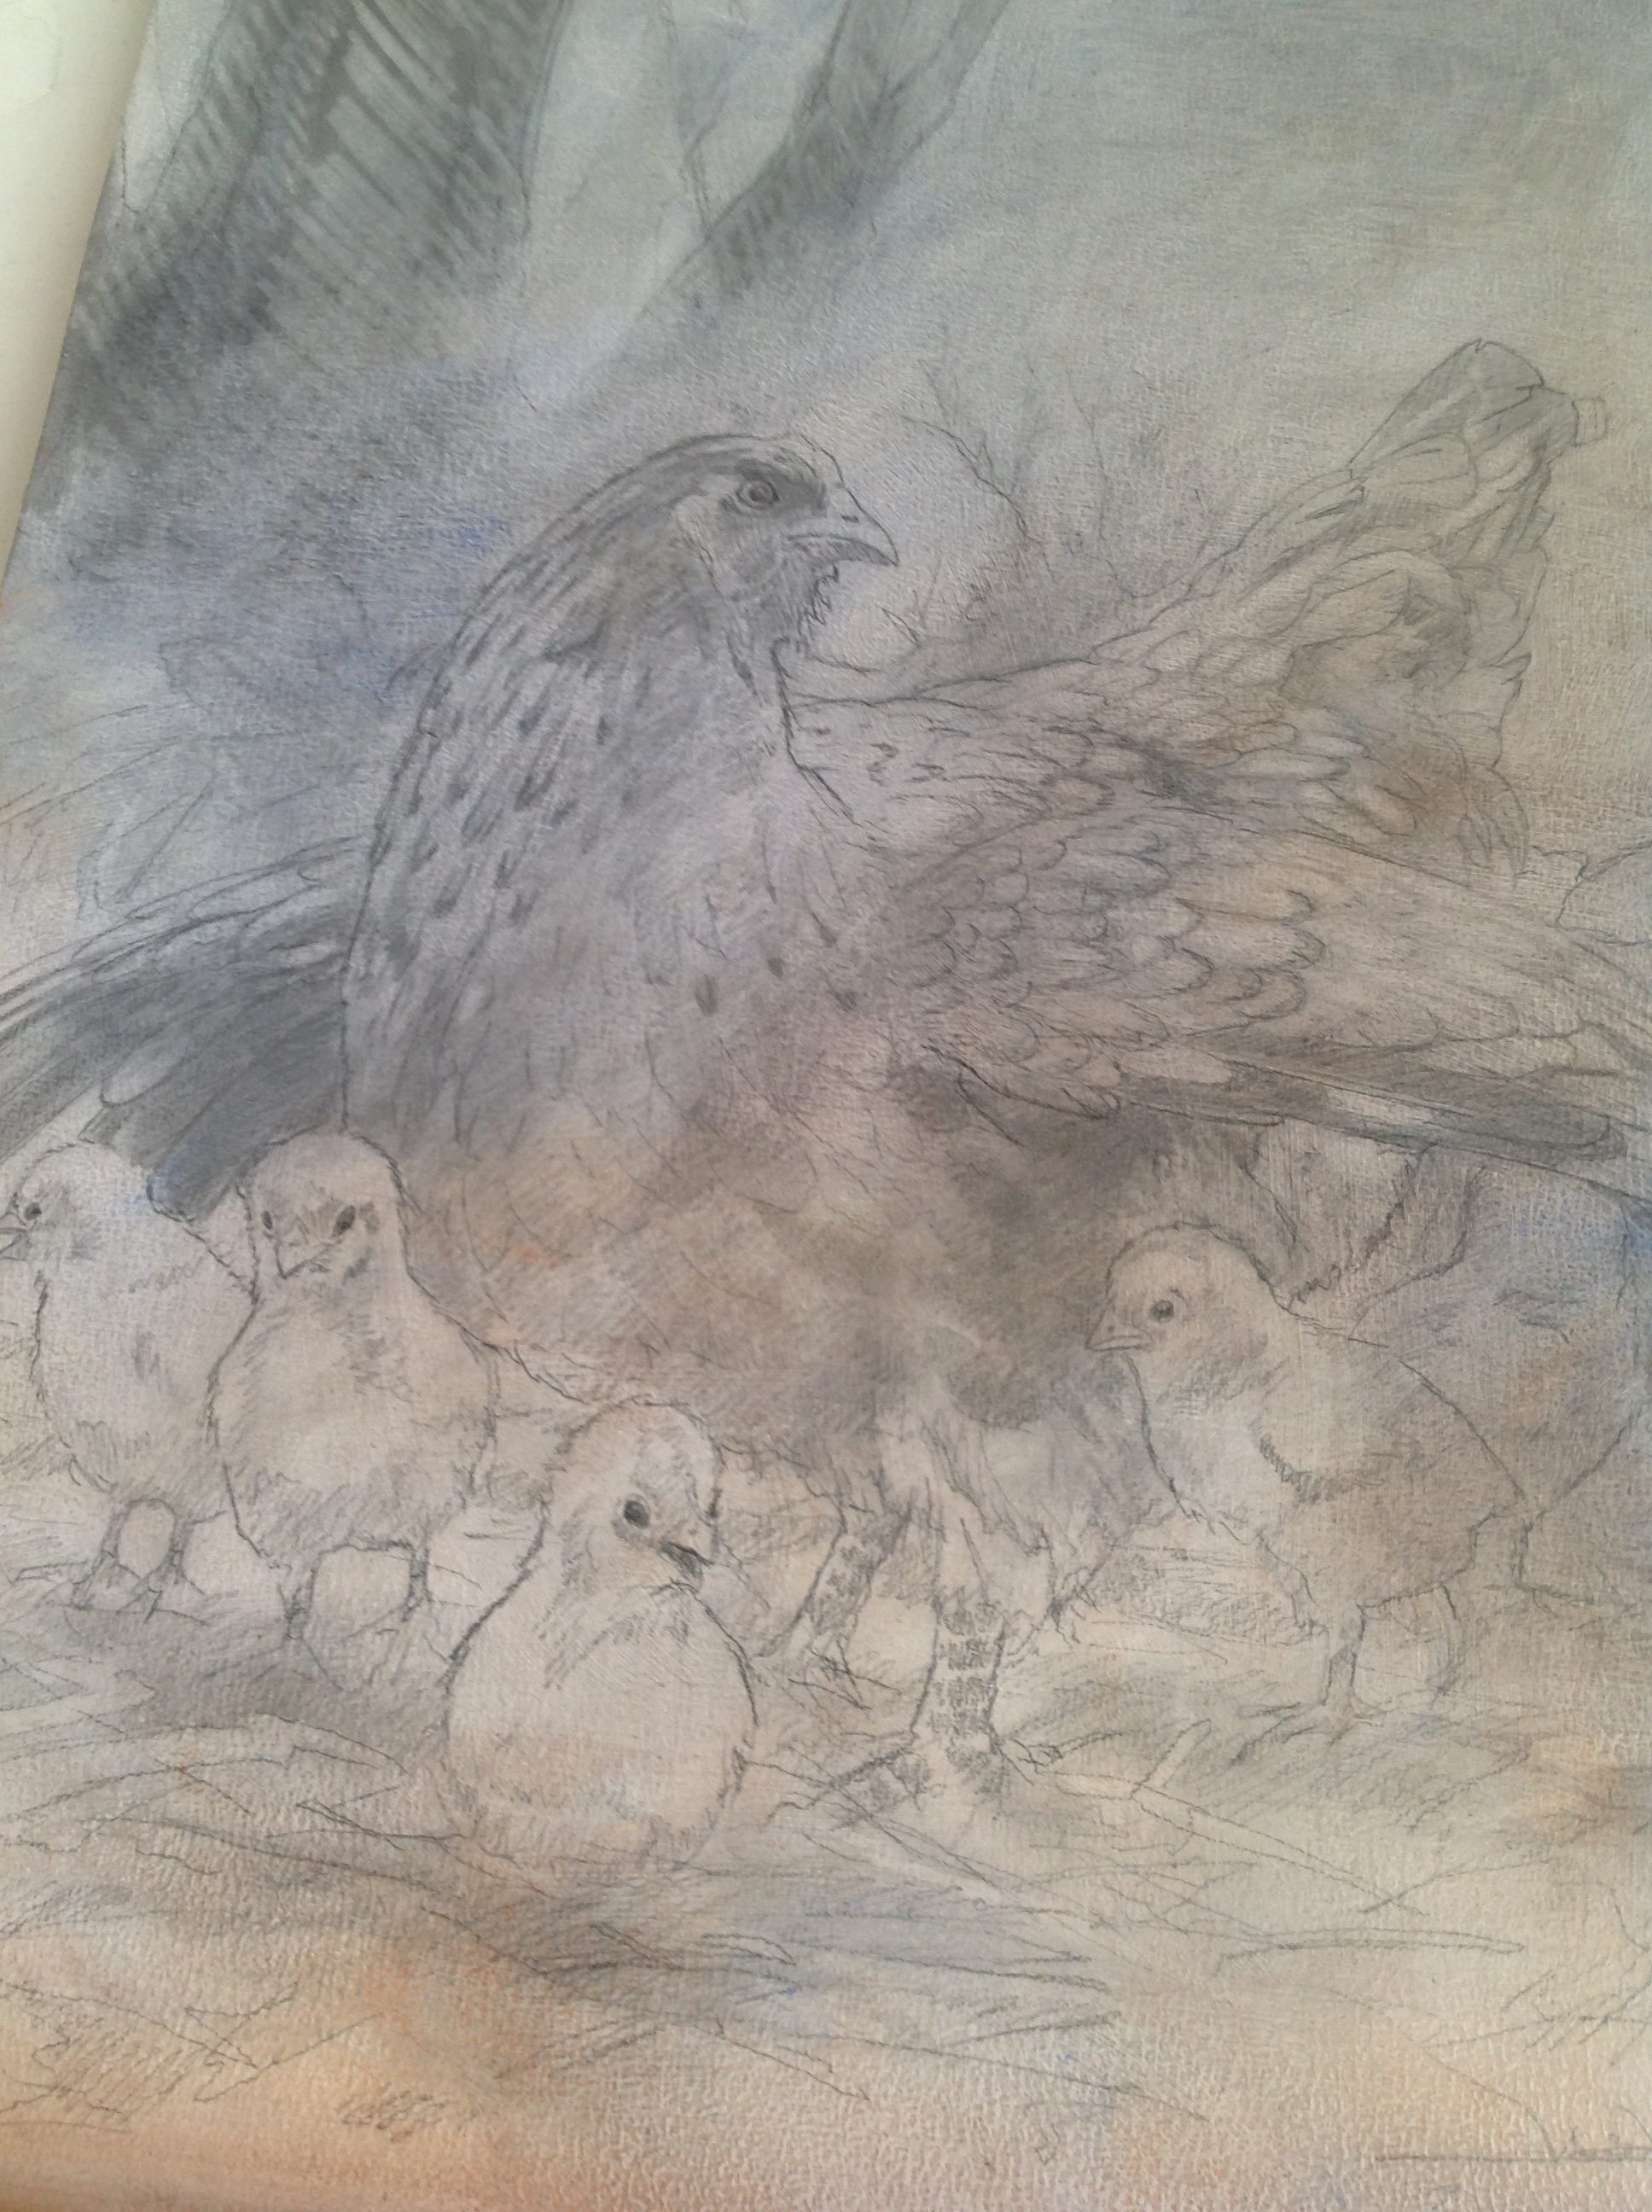
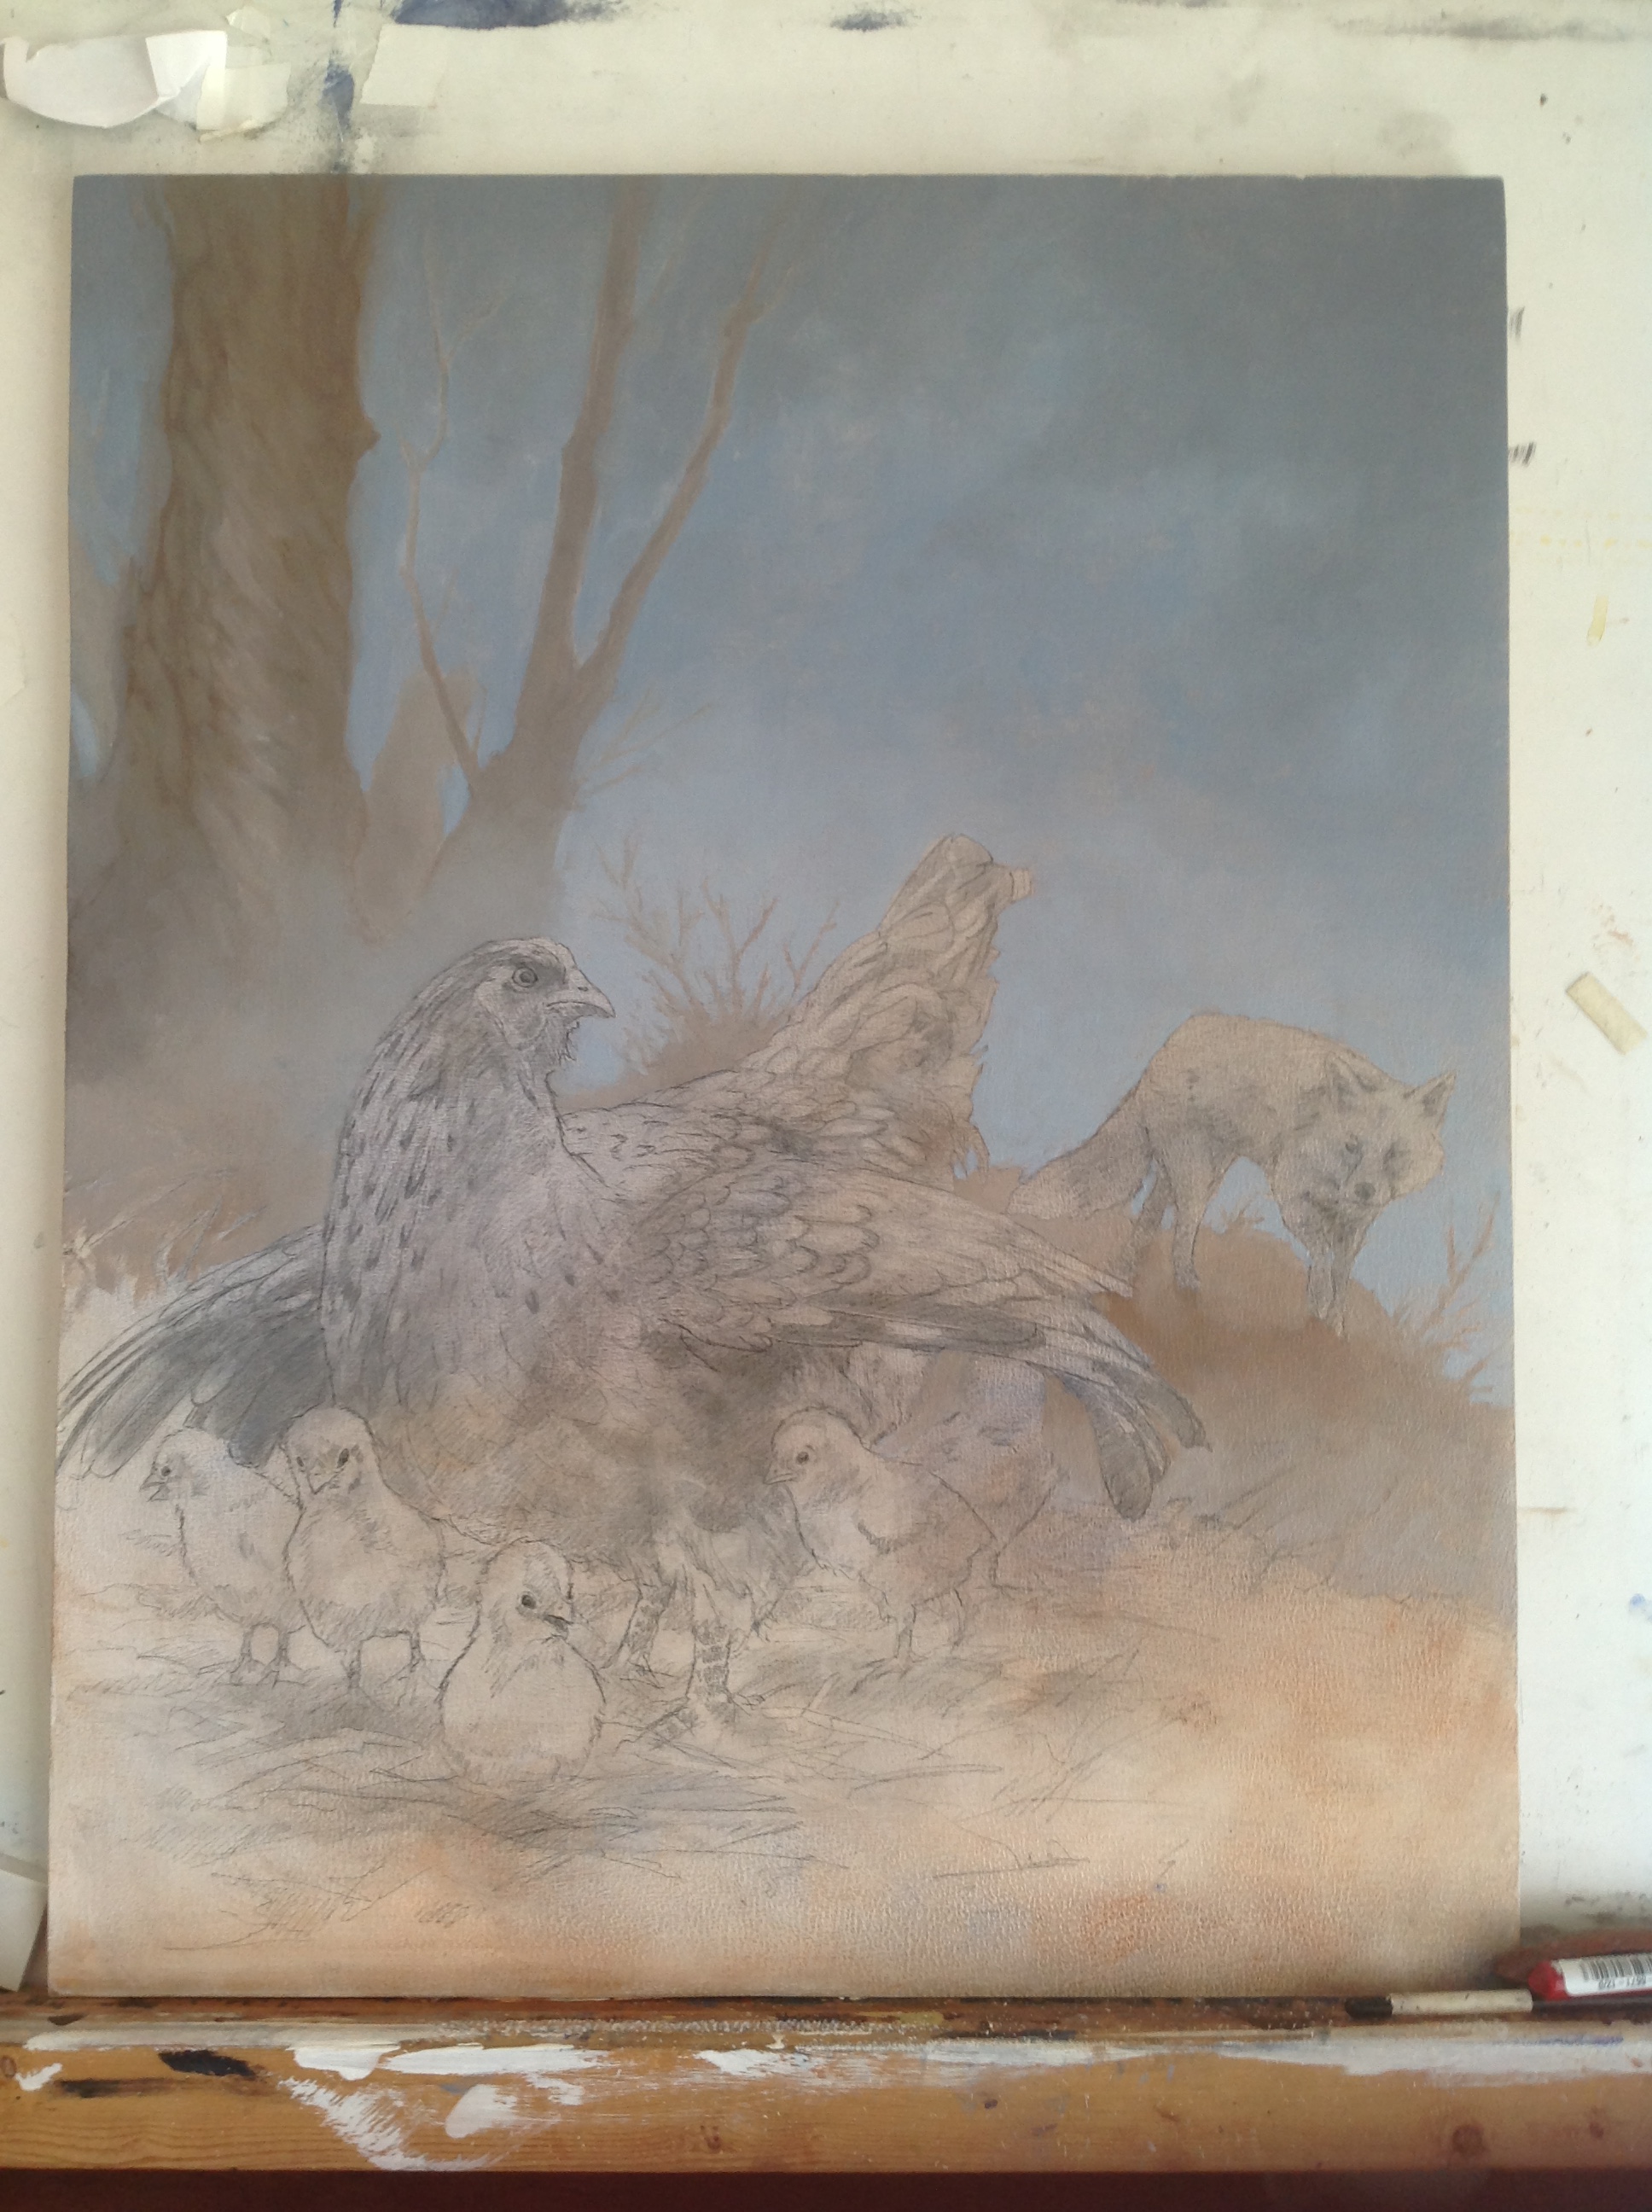
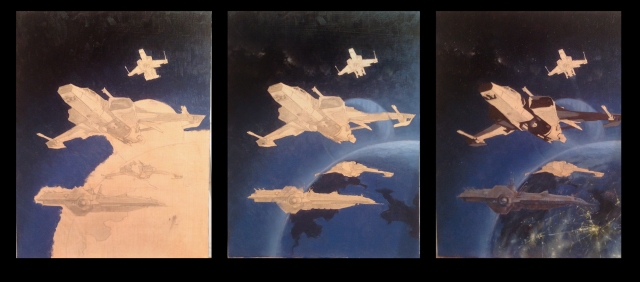
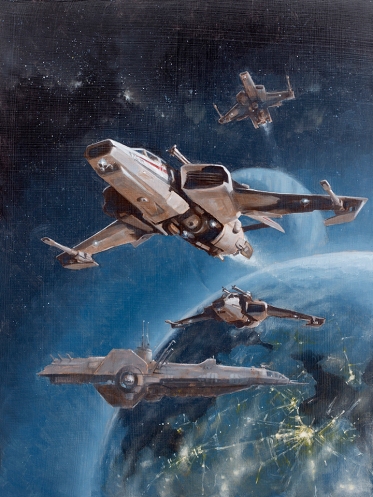
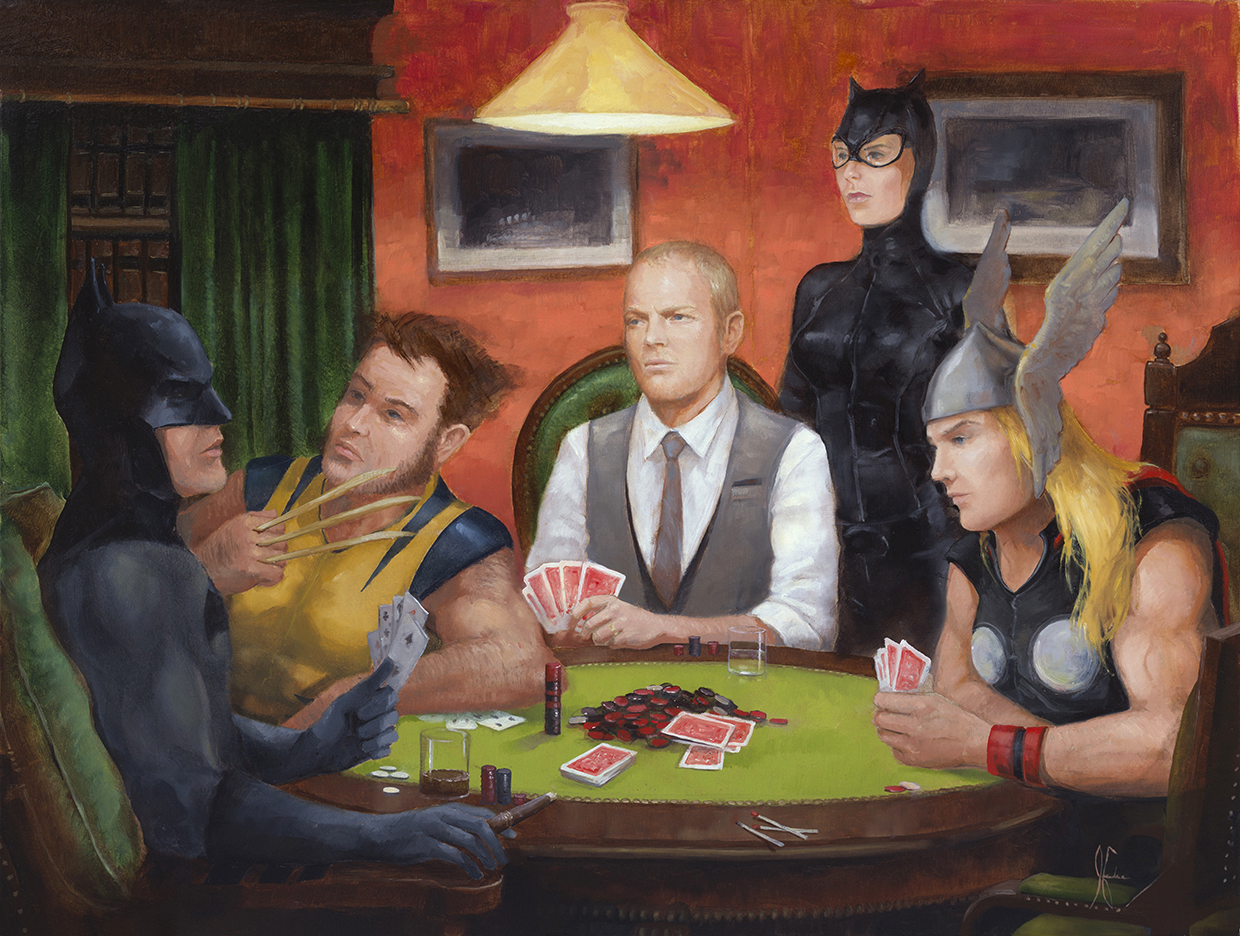
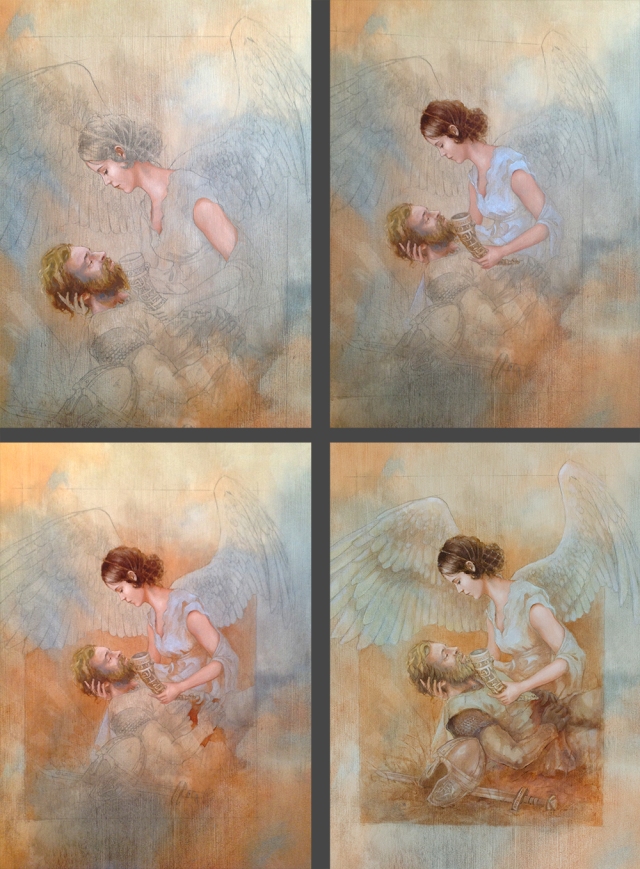
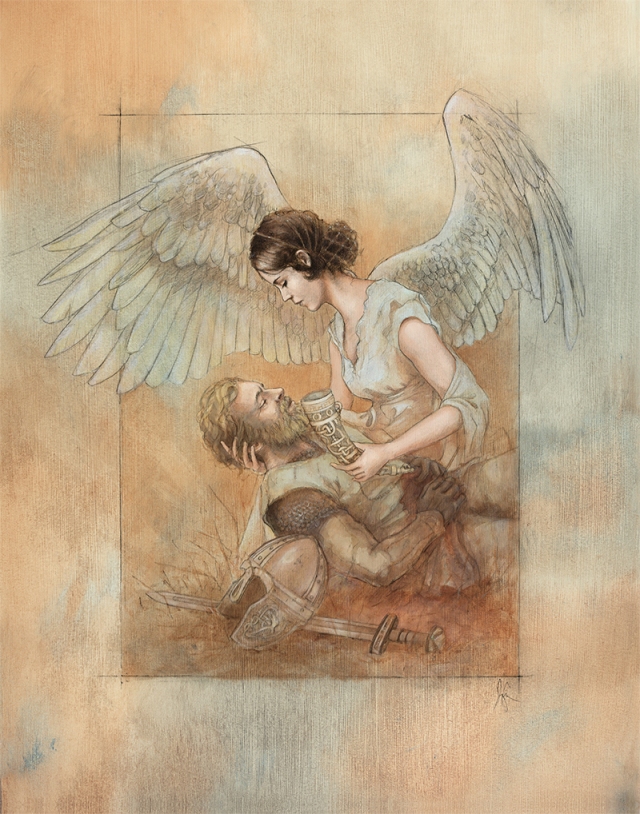
With the panel ready to go I began painting. I tried to include adequate detail and opacity in the areas of interest but also be a little more transparent farther from the center. The idea here is really just that I am more comfortable painting with oils and I like some of the detail and opacity for faces etc., but I want a sort of watercolory feel. Which is why, when finished with the oil painting, I photographed the whole thing and used my photos of the drawing to bring back the pencil lines that had been obscured by paint, but which would still be visible in a watercolor.

Four stages of process painting valkyrie by Jameson Gardner © 2016

In order to get a really high res digital version of my painting without a giant scanner, I usually take it in 3 or 4 overlapping segments in landscape orientation. I left enough room around the edges and overlap, enough to be able to eliminate the vignette that my 50 mm lens creates. I used the 50 mm to minimize distortion ( the last thing you need when photographing artwork or even reference, is lens distortion.) I also usually take a shot of the full image to use as a guide when stitching them together, which I do manually (unfortunately, photoshop has never yet succeeded in putting my artwork back together without distorting it). I corrected any angle problems with the guide photo and made sure the dimensions and proportions were accurate. Then I scaled it up to the final size and brought in my higher res segments. I aligned them to the guide, which in this case was actually the photo of the original drawing, using the edit-transform-distort to drag the corners and line up all the details. I put the new layers on top at 50% opacity. This can take a little time depending on how easy it is to identify landmarks to align and how close they are to the corners. The closer to the corner you can align things the faster it will go. Then I manually merged the segments with layer masks and moved the drawing on top as a multiply transparency at around 55% opacity.

Even though I knew I would be overlaying the drawing to complete the image, I was a a little surprised by how much I like bringing the pencil back.

Valkyrie bearing mead painting by Jameson Gardner © 2016

Hope you like it as well. I’m adding some prints of this to my inventory. The Etsy shop was sort of closed down when the baby was born. But if you can’t live without a print of this, I’m happy to take orders by email. Or, any Utah folks could drop by my booth at Sugarmont Plaza on July 23rd. Cheers!


Digital Exercise

After the digital failure I mentioned in my last post, I felt like there was a blatant gap in my skill set. It seems like everybody who is anybody can paint digitally these days. Back in school when I had my first digital painting class, I thought my work was on par with my fellow students. However, I ended up focusing more on traditional media and my peers who kept up with digital painting are now killing it, while my skills are sadly wanting.

So, I decided to practice (they say that is how you get better at things). I dug up an old piece of reference and just started making an image. To start with, it felt as digital painting always does for me—like I’m fighting the pixels. They just don’t do what paint does and I spend time trying to wrangle my tools rather than focusing on making a good image.

Then with time, I started to work out a process by which I could reasonably control what was happening on the screen. By the time I finished this piece I felt I was doing alright at this digital painting business. Of course, that is when I saw the latest digital piece Miranda Meeks, one of my old classmates from BYU, had made…. and I decided to go buy a big panel to do some oil painting 🙂

Here is my digital exercise:

Digital study of woman by Jameson Gardner

Below is an animation of some of the stages of progress. I decided before finishing it off (above) that she was leaning too far forward, so I tilted her back and then did the background.

Animation of progress on Digital Practice

Standard Bearer

I wanted to add something with a sort of fantasy battle bent to my portfolio. The concept was a warrior carrying a standard or banner behind which an army could rally and charge. Initially, I intended to work in watercolor and then make some digital enhancements. Justin Gerard is a great example of an illustrator who often works this way. Justin’s work has a sort of whimsy that I wasn’t really looking for, though, and I made the mistake of also looking at some fully digital work from Blizzard projects and things like that. I started covering more and more of the watercolor underpainitng with digital, but still trying to leave some of the texture showing through. The result was turning into a horrible hybrid that did no justice to any of the styles, or concepts that inspired it.

This is one of those instances where I hesitate to share some of the images from this process. But, since I make fun of people on social media who only share the best parts of their life, and only the most flattering photos of themselves, here goes.

First up the Drawing and watercolor underpainting.

Underpainting and drawing for Standard Bearer painting

Next is my first pass of digital “enhancement”. At this point I was realizing that I hadn’t done my drawing and underpainting large enough and with enough detail to leave this much of it showing.

First pass digital

I started adding more and more digital color etc. But I wasn’t willing to go full opaque digital, I was still trying to keep texture and color from the underpainting—I was also having a hard time forcing myself to zoom in and get the details right.

Failed attempt at digital painting standard Bearer

Like I said it all turned into a frustratingly horrible hybrid that made me wonder how I ever thought I could make art. I then decided to give it one last try. I would go back to the physical watercolor painting, seal it, and paint the whole thing in oils. There were definitely some draw-backs to this. The texture of the paper wasn’t may favorite, and I was limited by the original scale. But, at least it was a medium that sort of makes sense to me.

First sections of Standard Bearer painting in oil

I immediately felt a little better when I put down the stylus and picked up a paintbrush.

Oil painting of Standard Bearer charging into battle. By Jameson Gardner

Like I said, texture and scale were limiting, but I feel like this is 147 times better than my digital attempts. I learned some important things from the experience. First, pick a style and stick with it (at least for the course of one painting). Next, if you want to do all Justin Gerard you need to draw and paint at a scale where you can get all the detail. If you want to go all Blizzardy you need to be willing to go full out opaque digital. I’m not giving up on that either, I’ve been practicing my digital painting skills and have already produced some studies that are more appealing than where this project was going. Maybe I’ll post one of those next.

Heroes Playing Poker

Heroes Playing Poker Parody of Dogs Playing Poker. By Jameson Gardner Art

I’m sure most of you have seen some of the paintings by C.M. Coolidge of dogs playing poker. According to Wikipedia Coolidge was commissioned to create the paintings as part of an advertising calendar for cigars. Dogs Playing Poker has become an icon of American low-brow art. It is the type of art the common man can get really get behind—the type of art that looks great cut from a magazine or calendar and slipped into a cheap frame to be found 30 years later in your grandmother’s attic among Uncle Leonard’s boyhood effects.

Naturally, I had mixed feelings when I was approached by a client about doing a parody of one of Coolidge’s paintings—a portrait of the client playing poker with a few favorite comic book superheroes. The concept was undeniably fun, but not the type of art I had seen myself making as I studied in college. I took the job.

First step, as always, was to work out an initial sketch. The basic composition was already set by original Dogs painting, so I just had to figure out how to fit in our new characters. This is the first sketch I sent to the client.

Sketch for heroes playing poker commission by Jameson Gardner Art

When that was approved I shot and composited reference photos.

Composited reference for Heroes playing poker painting by Jameson Gardner

Using the reference I began the final drawing onto which I would paint. I also sent photos of this drawing to the client, getting feedback until the drawing was approved.

Drawing for Heroes Playing Poker Painting by Jameson Gardner

Finally I got painting, and then it was just a matter of pushing paint around until it landed in the right spots… Which can be a little tricky when it is supposed to be a portrait of someone specific, but their head is only 2 and a half inches tall. (Yes I did negotiate an increase in painting size, but the client only has so much space in his office.)

Painting process of Heroes Playing Poker by Jameson Gardner

Dogs Playing Poker by C.M. Coolidge

Heroes Playing Poker Parody of Dogs Playing Poker. By Jameson Gardner Art

Hope you enjoy!

Painting a Princess

Graphite sketch of princess with decorative french hood. By Jameson GardnerI’ve been drawing and painting again (bet you wouldn’t have guessed). I wanted to do a queen or princess with a kindof renaissance feel. I’ll admit right up front this isn’t supposed to be a historically accurate period piece. I guess it would be more of a historically inspired fantasy piece. Using a combination of some headdress references i found on Pinterest, a vintage photograph (for her face) and my own imagination I figured out the gist and went ahead and started drawing. It wasn’t for a client, so I didn’t plan it all out in detail—I just wanted it to have a certain feeling. I did the drawing on a some paper that I inherited from my grandmother. I’m not sure how old it is, but it had definitely yellowed and even has a little bit of foxing starting to show up. That is right—the image above is not just a bad scan with smudges, that is the actual color of the paper.

Originally I was thinking to achieve the feeling I wanted I would use watercolor. I got attached to the drawing though. I wanted to keep it, and decided to print a copy to mount and paint. Unfortunately, I get impatient and wasn’t willing to wait 4 days and pay extra to have it printed really nice. I ended up with decent copy from a copy shop (I made them print it on my paper, which helped a lot). I mounted it on a masonite panel being careful to preserve the top surface so that it would absorb my paint. Just in case, though, I tested some water with a brush on my backup copy and determined that no matter how much fixative I used, the ink was not going to hold fast if it got good and wet.

Plan B: I coated my carefully preserved top surface with matte medium and broke out the oil paint.

Progress on oil painting of princess by Jameson Gardner

I started with a wash of Burnt Sienna and Ultramarine and lifted some highlights out of that before I went to town on the opaque parts. It is 11 x 14″ so she has a 3 inch face. I know some people are great at painting small but this is right on the verge of being too small for me so keep that in mind while you judge 🙂

I used a very limited palette Burnt Sienna, Yellow Ochre, Ultramarine, and White. You can get lot out of just a few colors and it is way easier to feel unified. I tend to do some transparent washes at the end to unify things even more as well. You’ll notice the blue of her blouse, pretty bright above, is tempered by some Burnt Sienna in the final below.

Oil painting portrait of princess by Jameson Gardner

I tried to be transparent where I could and let it just fade away rather than paint up to the edges. I also decided not to paint a background and just let my original wash show. This was all to try to keep it in line with my original vision. I’m pretty happy with the result but I feel like I lost the quality of the graphite drawing in her face in a way that I wouldn’t have with watercolor.

To get a high resolution image I took multiple photos in segments and merged them in photoshop. I let photoshop do it and—as usual—the old girl didn’t catch the vision of how to bring things out proportionally. So I did it manually. When finished I wanted to double check to make sure I hadn’t skewed or stretched it. I overlayed the digital file of my original drawing, which lined up pretty much perfectly. That is when I had the thought that maybe I could get closer to my vision by bringing back some of the pencil over the top. All it took was that drawing on a couple of transparency layers and there it was 🙂

The original painting still looks pretty good (even better in real life) but I think the pencil overlay version really matches what I wanted to share. So, here it is:

Fantasy/Renaissance Princess by Jameson Gardner Art

Is that cheating? Well if you belong to some kind of purist traditional school, yes definitely. But, let’s face it, these days the fact that I drew it on paper with an actual pencil and then painted with actual paint probably puts me closer to those purists than to a lot of what is being produced in the digital world.

I hope you enjoy! I’m considering making prints of this—if you’d like that, leave a comment, head over to my Website and shoot me an email, or contact me through my Etsy shop to let me know so I can see what kind of interest there is. Thanks 🙂

LDS Art Competition Entry

Oil painting of New Testament Scene at Galilee by Jameson Gardner Art

I found out in January that the Church of Jesus Christ of Latter-day Saints (of which I am a member) was holding an international art competition. Submissions had been open since late Summer sometime, and the final deadline was February 27th. With the holidays and some other things I was working on, I didn’t get started ’til February. By which, I mean I didn’t even start sketching ideas until February.

The theme for the contest is “Tell Me the Stories of Jesus”. With a theme like that, your mind automatically goes to the New Testament. I didn’t want to rehash a scene that has already been done often and probably better. So, I was first thinking about doing the storm on Galilee before Jesus is awakened and title it something about faith before the miracle.

Brainstorm sketches for lds art competition by Jameson Gardner

I liked the idea, but wasn’t really feeling it at the time, so after a bit I moved on to something more figurative. I knew I didn’t have time to do something super detailed or extensive. I thought perhaps I could do a simple version of Christ with the Samaritan Woman at the well. The sketch below was for that concept, I just hadn’t drawn the woman.

Sketch of Jesus at Well by Jameson Gardner

After some discussion with my mother and sister, I abandoned that idea too. We discussed depicting scenes from other scripture or modern missionary work, but I finally settled in on a scene showing a woman inviting an acquaintance to come listen to Jesus who is disembarking from a boat in the background. It would embrace the theme without having to rehash any of the most popular bible stories.

This is the preliminary sketch:

Preliminary sketch for New Testament Painting by Jameson Gardner

With the composition decided, two of my sisters posed for reference photos. By that time, I was within a week and a half of the deadline. I went ahead and drew right on my gessoed panel, sealed that with matte medium and got painting.

Drawing on panel for oil painting by Jameson Gardner

I didn’t really have time for much more than a first pass at most of the painting. However, there were some areas where I had to come back and tweak—this girl’s face for one. I shared the in progress image on the left on Instagram and quickly realized I wanted to fix some things. Her eye was one of the main things bugging me—I’m glad I adjusted it.

Comparison of first pass with finished face by Jameson Gardner

The sequence below also shows how I pretty much had to paint one area and move on. This time constraint made it hard for me to build up the texture that I wanted since I didn’t have time for regular oils to dry before glazing. So, in the lower third I had to paint a blobby liquin mixture that mostly dried by the next day so that I could paint thinly over that and have enough time to glaze over that. Neither my usual nor my favorite way to work.

Four work in progress shots of New Testament Oil Painting by Jameson Gardner Art

In the end, I got it done for the deadline. I’m still kind of undecided on how I feel, though. Sometimes I look at it and think “you’re a failure” and other times I think “hey, not bad”. I hope some of you will enjoy it, and we will let the jurors of the competition be the ones to pass final judgment.

Quail Painting

My sister-in-law expressed interest recently in having some small quail paintings commissioned. So, when I had a little extra time and a square of toned canvas left over from another project, I thought I would do a little quail.

Oil Painting of California Quail by Jameson Gardner Art

There isn’t a whole lot to say about it. It is a California Quail—the kind that we have running around here in Utah. the canvas is an 8″ square and it’s painted in oil.

I suppose it might be interesting to note that a general rule in oil painting is fat on lean—you thin the first layers and build it up thicker on top. Thinned oils will be difficult or impossible to lay down on unthinned paint unless it is already dry. Which is why I follow that rule until my last layer. I often like to let everything dry for a couple days and then come back and do some glazing with an oil liquin mixture (usually burnt sienna, my favorite pigment). Below is an in progress shot, before I did any glazing or added any of the environment.

WIP Oil Painting of California Quail by Jameson Gardner Art


Clipper Commission

Clipper Ship Emerald Isle

I just finished this painting of the Emerald Isle, a clipper ship built 1853 in Bath, Main. The client commissioned this to commemorate her ancestors, several of whom immigrated to the United States aboard the Emerald Isle in 1868.

With some information about the ship and the ancestors’ crossing, my first step was to do a series of thumbnails with different perspectives, croppings, and the ship in different attitudes. I sent this sheet with several of those to the client to begin our dialogue about the composition. Over and over I’ve heard artists and illustrators caution not to include any thumbnails you wouldn’t want to paint, because invariably, those will be the ones the client will choose.

Well, of my thumbnails, I didn’t really like the composition or perspective of #3 or #6, but I thought I would include them for variety’s sake. The client liked #6 🙂 With a little discussion about what she liked about 6 and the compositional and dynamic advantages of #2 (my favorite), we were able to make a plan to adjust #2 to suit us both.

Clipper Thumbnails

Next, I prepared a larger sketch and value comp implementing the adjustments from the thumbnail. When the client approved that, I moved on to painting.

Clipper ship Emerald Isle commission value comp.

Though I paint on both canvas and panel, if I have the choice I usually go for panel. Gessoing it myself, I can not only control the overall texture, but also that of specific areas.

Once the board was gessoed, I made my first time-robbing blunder. Every project has to have one or two, so I am happy that this one wasn’t too bad. I didn’t have any transfer paper on hand—so I decided rather than go to the store, I would just make my own. I sprinkled a sheet of thin sketch paper with graphite powder and rubbed it in with isopropyl alcohol. It looked pretty good and I proceeded to make the transfer tracing from a printout of my sketch.

When I pulled the sketch and transfer paper away, it revealed a mess of graphite in which I could sort of make out the crumbly outline of a ship. I had used too much graphite powder and it caked pretty thick in some places. I wiped away of as much as I could and re-gessoed. While the gesso was drying I made a trip to the store to pick up some transfer paper ;).

Process shots of clipper ship Emerald Isle Commission.

Finally with a good transfer, I went over the drawing again by hand, sealed that with matte medium and did some light acrylic washes to establish a little color and value. Then, with the acrylic dried I switched to oils and painted the sky. Next I did the sails, then half the water. I painted the hull before the water on the right side so that I could let it mostly dry before doing the waves that overlap it. Once it was all painted in. I spent time making adjustments etc. and then I did some thin glazing with burnt sienna (my favorite pigment) to help tie the colors together—I think I’ll have to make another post later about my approach to color. I hope you enjoy.

Clipper Ship Emerald Isle commission on Easel.